>
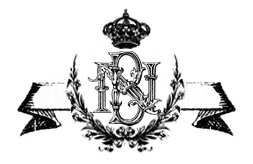
I have always LOVED the look of a monogram where two letters intertwine. I have a stamp of my initials together that I bought 20 years ago! I bought machine embroidery patterns that will put the one on top of the other (but not “intertwined”). I have several fonts that are built to be layered but not “intertwined”. FINALLY, today I had a WELL DUH moment when it suddenly occurred to me that I just need to use layers and erase part of the layer of one letter. HELLLLLLLOOOOO…..Yes, I’m a little slow getting there, but hey! I finally did get it!
Here ya go:
This font is called “Museum Initials”. ($12) BUT WAIT!!! Before you think about buying it I just found almost the same EXACT font called Burgoyne Initials for FREE at DaFont.com …. Feeling kinda stupid now!
They start out looking like this:
4. Change the size of each to your liking… I stretched the B taller and made the N wider
5. Now erase the part of the top letter that you want to appear to be BEHIND the other letter…that will let that portion of the bottom letter to show through and that portion will appear to be on top. On my NB I just erased the very small portion on the top left of the N…. that’s it! (now on this one it is kinda cool that the ring around the middle of the N really kind of looks like the middle of the B – I like that)
 A version of this FREE frame is HERE
I REALLY AM trying to give something away here!!… click on picture to the right to see how to get it……>>>
And this one is HERE … I modified this one a lot because I needed for it to fit onto something.
Another MUCH EASIER option is to use MFC Sappho Monogram Font ($29.95) that looks like this:
Be sure and check out all of Brian’s other monogram fonts while you are there … I have almost all of them! LOVE!
Linked to:


>Beautiful monogram!
>Very cool! Love how your monogram turned out!Visiting from the Graphics Fairy. TFS!
>Thanks so much ladies! Now that I know how I want to overlap all letters! HA! Like there's time in the day for that right?!Again, THANK YOU for commenting and letting me know you were here! I TRULY appreciate it!N.
>Hi Nancy,I popped over from the Graphics Fairy and am so pleased I did. I love your monogram and learned alot from your tutorial.Thanks,Kerryanne
>Thanks, Nancy!I enjoyed visiting you.junoxxJuno's PlaceCards by Carol